Thank you for choosing the TERA Dry Eye Imager®. This page provides a complete set of resources to help you seamlessly set up your device, learn the capture workflow, review results, and integrate TERA into your clinical practice. Whether you are getting started for the first time or updating your knowledge, the materials below will guide you through each step of the process with confidence.
1. TERA Desktop Viewer Configuration (Optional)
The TERA Viewer is an optional desktop application that enables review, management, and analysis of data captured by the TERA on a network-connected computer, providing expanded access to images and reports beyond the device itself.
If you plan to use the optional TERA Viewer software or would like assistance connecting your TERA device to your clinic’s network, our team can help with configuration and setup. Installing the software in advance will help ensure a smoother and faster support session.
If you have trouble installing the software or cannot access the USB drive, please contact Customer Support directly for assistance.
Recommended PC specifications for TERA Viewer:
Windows 11 (64-bit)
At least 4 GB of RAM
At least 4 GB of free storage space
Minimum screen resolution: 1280 × 1024
TERA Viewer Installation Recommendation
We recommend downloading and installing the TERA Viewer software on your PC before connecting with Customer Support.
A copy of the TERA Viewer installer is included on the USB drive provided with the TERA device. Please follow the steps below:
Insert the USB drive into your computer.
Copy the TERA Viewer installer from the USB drive to your computer (for example, to the Desktop or Downloads folder).
Once copied, right-click the installer file and select “Run as administrator.”
Follow the on-screen instructions to complete the installation.
To schedule a support session, please submit a request through the Customer Care Portal, and a Topcon Healthcare representative will contact you to arrange a convenient time.
Please note: This appointment must be scheduled separately from remote training, and your clinic’s IT staff must be available during the session.
Hours: Monday–Friday 8:00am–8:00pm EST, Saturday 9:00am–5:00pm EST.
2. Get Started: Quick Capture Setup
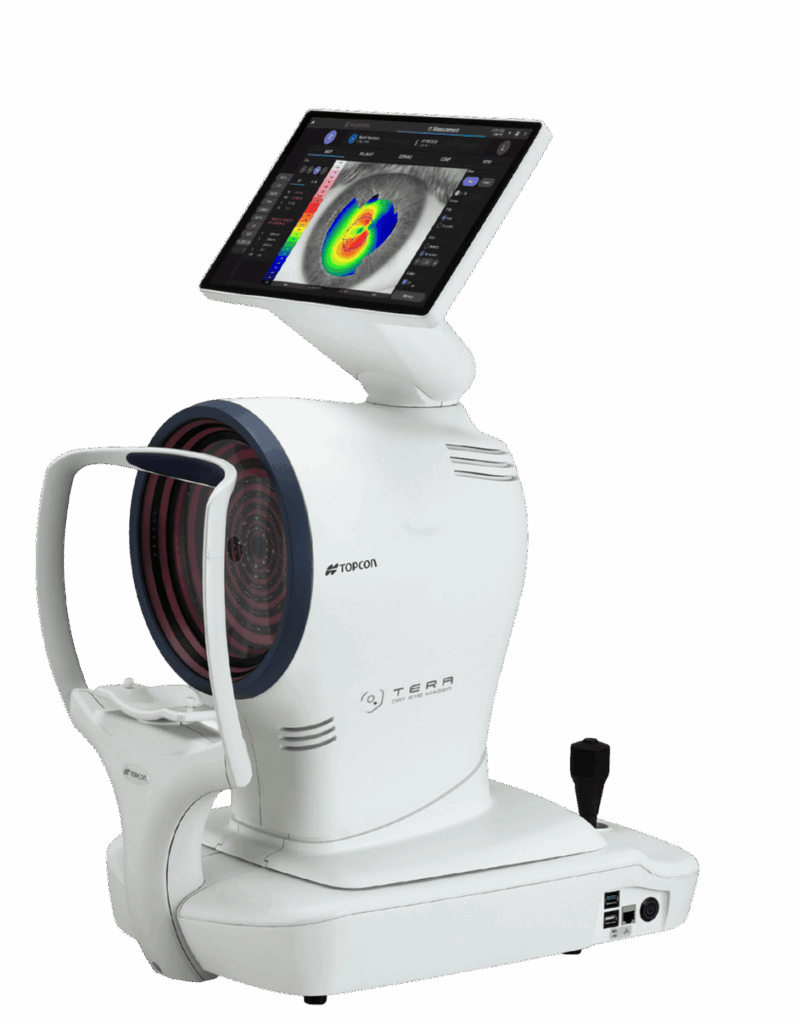
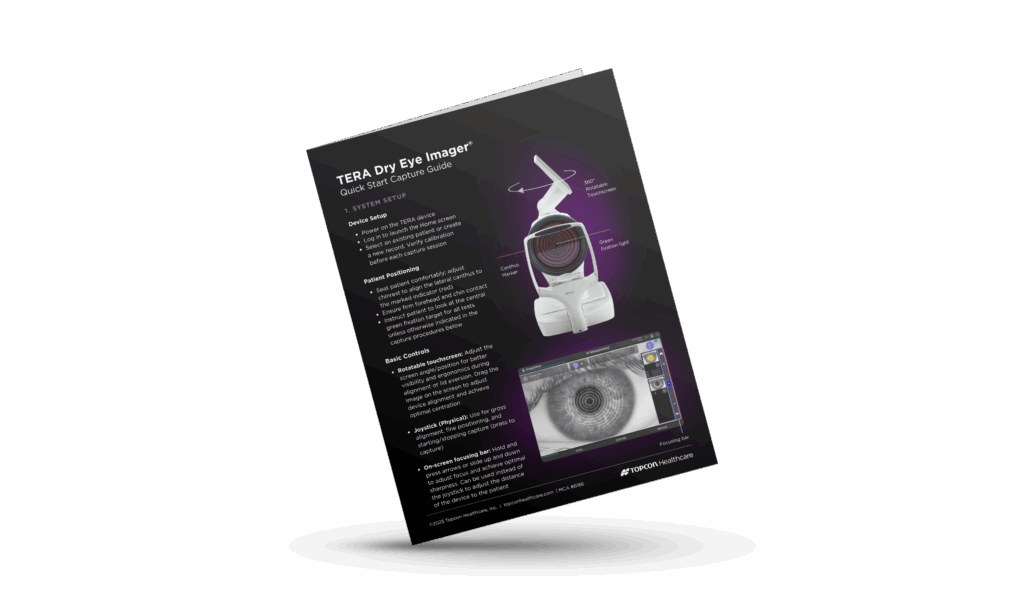
Begin here for an introduction to TERA system setup, patient positioning, and image acquisition. This guide walks you through the essential steps required to perform successful captures for corneal topography, pupillometry, and dry eye testing.
This demonstration video provides a comprehensive walkthrough of the TERA workflow. You’ll learn how to position the patient, initiate captures, review results, and navigate the TERA interface with confidence. Ideal for new users or for training additional staff.
Hi everyone, I’m Jessica Sun. I’m the senior marketing manager for
myopia and ocular surface disease at Topcon, and we are really excited
to introduce the TERA Dry Eye Imager. This is our multimodal platform
for corneal analysis, pupillometry, as well as a fully integrated dry
eye diagnostic suite. So we’re actually going to run through a test
sequence today. I have my patient here. We’re gonna start a new exam and
show you all the features of this new device. So go ahead and sit in. To
start, we have an optional questionnaire that we can answer for dry eye
screening, but I’m actually going to proceed to show you some of the
cool automated features that we have. Starting with topography, you want
to make sure that your patient is aligned with the canthus lined up to
the indicator here. You can go ahead and adjust the chin rest upwards
and downwards in order to get a better alignment. And then, for the
first test, we’re going to do topography. All you have to do is click on
the center of the pupil and you’ll see that the device is driving itself
and automatically capturing the topography image. Moving on to the left
eye, we’re gonna click the center of the pupil and you’ll see that,
again, there’s automated capture of the left eye. We’re gonna save both
images and if you wanted to, you could go ahead and zoom in and take a
look at that scan. Don’t remember it. We’re gonna move on to pupilometry
now. For this, we’re actually going to introduce lights inherent inside
the bowl. So again, this is an automated test where I can click on the
center of the pupil. We’re going to change the focus to optimize it, and
we’re actually going to take dynamic pupilometry where the lights that
are integrated within the bowl will turn on and off to simulate
different types of lighting, situations. At the end of this capture,
you’ll see that the dynamic pupillometry is saved, and then you can also
capture scotopic, photopic, and mesopic static pupillometry captures as
well. Moving on into the dry eye features, this is where we really have
exciting new features I want to show. So starting with the blink
analysis, we’re gonna take a look at how this patient naturally blinks.
I’m gonna go ahead and get this in focus. You can either click on the
joystick here, or you can start the capture with the capture button on
the screen. So we’re gonna have the patient go ahead and just naturally
blink, and we’re gonna capture how many times the lid actually closes
over the pupil. So when we’re ready to calculate how many flings per
minute, we can either again stop the capture with a joystick or with the
touch panel. Moving on to non-invasive tear breakup testing. This is
another automated test. We’re gonna have the patient focus at the green
light that they see in the bolt. I’m gonna tap on the center of the
pupil. The device is again automatically focusing, and when it’s ready
to capture, I’m gonna have the patient blink and then open wide. And
then as you can see, the device is going to pick up areas where there is
breakup of the tear film, and then when he blinks again, we’re going to
stop capture automatically. This is, again, an automated capture
sequence, so I can move to the right eye, and we’re gonna complete the
same sequence. Go ahead and blink and open, and again, you’re gonna see
the tear films break the tear film breaking up over the different
sectors. If I wanted to pause the capture here, I could go ahead and
click the button, and then we can go ahead and save that image. Moving
on to tear meniscus height, this is gonna be capture of the thickness of
the tears, so we can actually use the touch panel to get in focus or get
in the right area, and then we can move in or out with this focus panel
here. And our goal is to really get a nice, high quality in focus image
of the lacrimal lake here. The higher the red signal, the better the
quality of the scan. When we’re ready to go, we can go ahead and click
that capture button. We’re gonna have a little bit of focus optimization
as well to ensure that we get the best quality image. You can always
take a closer look at any of the images that you capture to ensure that
everything is fair and in focus. Moving on into the redness grading.
This is going to be the really the wow factor for this device. We have
high resolution color imaging integrated into the TERA. And as you can
see here, the lashes are visible as well as the iris and the cornea and
conjunctiva. So I can take an image here by again tapping on the screen.
I can also have the patient look to the right. Go ahead and look to the
right and to the left, a little bit higher, and then up into the
Lassett. Yep, there we go. And then take a couple images there. And that
way, we can take a look in all gazes, and again, you can access any of
these photos down the gallery to the left. Now moving on to blepharitis,
we’re gonna have the patient look down so we can take a look at the
image of the lens, and as you can tell, I’m using my finger to actually
drag the image, and I can also use the focusing scale here to scroll in
or out to make sure that I capture as much detail as possible. If
there’s something that I want to see here, I can go ahead and click the
one point five X button, and we can zoom in and take a closer look at
any specific area or landmark along the lashes. And again, two x gives
me additional magnification. Now I can take images at any of these
magnifications, that you see here, and you’ll see it actually saved in
the gallery. Moving on to the lipid layer, we’re actually able to take
images and videos of the lipid layer of the tear film. As you can see
here, I’m on the photo mode, so I’ll go ahead and capture some images
here. And then I can also switch to video mode and have the patient
blink naturally. I can also reduce the brightness if the light intensity
is too high, or I can change to get a wider view or a wider shot of the
images that I’m seeing. So we can either look at superior hemisphere,
inferior hemisphere, or a full three sixty degree view of the lipid
layer. Moving on into meibomian gland imaging, this is gonna be infrared
imaging of the meibomian glands. So I’m gonna get the focus centered on
his lower lid here and have him look all the way up. I’m gonna reach
over and pull down on the lower lid. You’ll see here that I can improve
the focus. Once I’m ready to capture, I can hit the capture button on
the side, and the image is gonna be focus optimized and saved. So this
is what it’s gonna look like. I’m gonna go ahead and close that image so
that we can take a look at the measurement tab. Before I end the
acquisition sequence, I do wanna also point out that we do have the
ability to do fluorescein imaging as well as Lissamine Green imaging.
This is gonna require the addition of essential dyes into the eye. We’re
not gonna do that today, but we can show you an example of what
fluorescein as well as Lysamine green staining look like in the
measurement tab. Now that we’re done with the full spread of tests, we
can go and take a look at the images that we were able to take. So
starting with the topography test, we have the ability to look at the
corneal map here. You’ll see a breakdown of the dioptic values across
different zones of the cornea, as well as the ability to look at
specific indices that tell us about, any irregularity in the cornea or
any abnormalities that we might want to zoom into a little more closely.
The AK tab tells us if this topography is compatible or not compatible
with keratoconus, and the P tab gives us information about the pupil.
Moving across the side here, you can actually see corneal aberrometry
values as well, and take a look at the white to white measurements of
the cornea. So this is gonna be especially helpful for contact lens
fitting. This is the pupilometry video that we took earlier. As you can
see, the pupil size will change as we introduce different light levels
in front of the eye. So this is a great way for us to track specifically
how the pupil size changes and reacts to light over time. This is a map
of our noninvasive tear breakup test. As you can see, there are sectors
that are pointed out where there were initial areas of tear breakup. If
we wanted to play back the video and take a look at the impact on the,
placido rings, we can do that as well. Moving on to tear meniscus
height, this is the raw image that we took earlier, but can also hit the
enhancement button and actually improve the contrast that we see here. I
can click on the analysis tab and actually drop in calipers to measure
the thickness of the tear film. And then once we generate at least five
points, we can actually ask the device to assess the average thickness
of the tear volume. These are our wonderful color images that we were
able to take in different gazes. This is actually, the post process
photos. These are the raw images where you can see the reflection of the
four LED lights. If we click process, we’re actually able to remove
those so that you have an unobstructed view Yeah. Of the eye. Looking at
our blepharitis images, you’ll see here that we have different zooms of
the same patient. So we can zoom in or zoom out, and we can also take a
closer look with the zoom function on the bottom of those three ears. We
also have the ability to grade the severity of blepharitis that we see,
and so we can pick and choose and save any score that we would like.
Moving right along down to the lipid layer analysis, if you recall, we
took both images as well as videos, so we can take a look at both of
those. And, again, there is the option on the photos to be able to
graze. Last but not least, with my biography, this is the image that we
were able to capture. Again, the raw image. We’re also able to enhance
the contrast with the sliding scale here. We’re also able to check on
the analysis button and go ahead and capture the area that we would like
to analyze for gland loss. This will automatically select the area that
you would like and show you the area of loss up at the top. In addition,
you have the ability to hit grade, select lower lid, and be able to
grade the severity of blind loss with the color grading scale. So that’s
all of the images that we were able to take together. So we’re gonna go
ahead and pause there. So I did wanna show the last two images that we
weren’t able to take in real time. So if we’re gonna, head over to a
patient who has signs of dry eye, We’re gonna go and show you what it
looks like when you capture a fluorescein image on a patient where we
instilled fluorescein dye and they have signs of staining. So here
you’ll see that this is a more global photo taken with Atara, and we can
actually zoom in to see signs of staining and evaluate on a grading
scale for severity as well. So since this looks pretty severe, I’m gonna
go ahead and save that image, and I’m actually able to show you the next
capability, which is Lysamine Green Staining. This is a different dye
that we can put in, and we can take a look at any areas of the lid
margin where there’s dying or devitalized cells. And that wraps up our
overview of the TERA Dry Imager. Please reach out to your local Topcon
rep to learn more or visit us on our website.
TERA generates multiple report formats that consolidate key clinical metrics. The TERA Report Guide outlines each report type and the specific data elements included, enabling you to efficiently identify clinically relevant findings and incorporate them into your diagnostic evaluation and patient management strategy.
Access the full TERA User Manual for detailed information on system features, specifications, and procedural guidance. This document serves as the comprehensive reference for proper use, maintenance, and long-term operation of the TERA.
Expand your knowledge with self-paced education through Topcon Healthcare University. A dedicated “How to Use TERA” course is currently in development and will provide:
Our team is available to support you. If you have questions regarding installation or technical assistance, please contact us via the Customer Care Portal.